Pasi's Grow Log 2026

Pasiasiainen

Well-Known Member
Joined
Jun 28, 2025
Messages
121
Points
93
Location
Finland
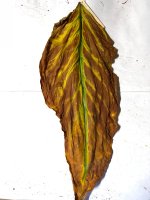
Maybe all hope is not lost after all. One of my Piloto Cubano seco leaves accidentally snapped off a week and a half ago, and I tossed it into my curing tent as a test, assuming it wouldn't cure properly, as I couldn't see any signs of maturity in it, or in any of the other leaves, probably because of my overfertilizing issues.

To my surprise, it has started curing to a really rich, deep brown. If it continues like this all the way to the end, and the rest of the leaves cure this nicely too, I may have avoided a disaster after all.

Happy happy!


Piloto1weekCuring.jpg
 

Pasiasiainen

Well-Known Member
Joined
Jun 28, 2025
Messages
121
Points
93
Location
Finland
I'd appreciate some thoughts on kilning.

My kiln is outdoors, and here in Finland the temperature can easily drop to -10 C (14 F) or even lower in December, when I'll still have tobacco in the kiln.

Because the outside temperature gets so low, I can't really avoid condensation if I humidify the whole kiln. My kiln isn't completely airtight, and there are some small thermal bridges anyway: screws, a window with little insulation, cable pass-throughs, etc.

Last year I kilned some Burley in watertight glass jars with 72% Bovedas inside, without humidifying the kiln itself at all. Once a week I opened the jars, lightly moistened the leaves and moved them around a bit. The leaves were folded inside the jars, and naturally they suffered a little from all the handling. They were going to become pipe tobacco anyway, so it didn't really matter. Results were good.

This year I'm trying to kiln cigar tobacco. I'd like to keep the leaves whole, straight and undamaged, while still avoiding humidifying the air inside the kiln.

Has anyone here tried something like this: putting whole leaves inside a vacuum bag - not vacuumed, not heat-sealed, but with the open end closed as tightly as possible - and then maintaining the humidity only inside the bag?

This would also save a lot of space compared to glass jars, since I could simply stack the bags on top of each other in the kiln. At the same time, I could put the different leaf types from each variety into their own bags right from the start, and then store them in the same bags afterwards.

Does this sound like a reasonable idea, or is this a road to disaster?

Another approach would be to frog-leg the leaves first, moisten them, fold them once lengthwise, then roll a stack of leaves into a bundle and put it in a glass jar. Long-term storage would then be a separate step.
 

The Haroo ln

Haroon
Joined
Mar 11, 2025
Messages
369
Points
93
Location
United kingdom
I would recommend dropping your RH to the mid 60s. That will usually help a little with condensation. The other thing i would suggest is to move the kiln inside to a warmer area maybe near a radiator so your heat source is not cycling on too much and creating extra humidity (if using a crockpot. Third suggestion would be to heavily insulate the outer walls of the kiln.
 

deluxestogie

Administrator
Staff member
Joined
May 25, 2011
Messages
26,574
Points
113
Location
near Blacksburg, VA
Has anyone here tried something like this: putting whole leaves inside a vacuum bag - not vacuumed, not heat-sealed, but with the open end closed as tightly as possible - and then maintaining the humidity only inside the bag?
I have successfully kilned whole leaf in large bags that were closed simply with clothespins on the folded opening. The leaves were pre-moistened, and never needed additional moisture over the 8 weeks of kilning.

Bob
 

Pasiasiainen

Well-Known Member
Joined
Jun 28, 2025
Messages
121
Points
93
Location
Finland
Thanks, @deluxestogie ! Great to hear that this technique works.

By the way, what kind of case were the leaves in when you put them in the bags? Medium, high?

And did you open the bags from time to time, or does the ammonia escape well enough through the opening without doing that?
 

Pasiasiainen

Well-Known Member
Joined
Jun 28, 2025
Messages
121
Points
93
Location
Finland
@The Haroo ln
Yeah, this wouldn’t be a problem if my kiln was indoors, but unfortunately that’s just not an option for me.

But luckily it sounds like I don’t need to worry about it too much. I’ll just put the leaves in bags and I think that should work out nicely. And that way I can safely keep the RH higher around the leaves without having to worry about condensation inside the kiln.
 

deluxestogie

Administrator
Staff member
Joined
May 25, 2011
Messages
26,574
Points
113
Location
near Blacksburg, VA
...what kind of case were the leaves in when you put them in the bags? Medium, high?

And did you open the bags from time to time, or does the ammonia escape...
The leaf can be in medium case (at room temp) when it goes into the bags. Once up to temp, it is likely in low case, since the humidity is relative to temp. I did not open the bags until they were done kilning. If I can smell ammonia, then it is escaping without my assistance.

Bob
 

Pasiasiainen

Well-Known Member
Joined
Jun 28, 2025
Messages
121
Points
93
Location
Finland
Autumn has arrived here in Finland, and the season is slowly coming to an end. Curing continues, and pretty much all the leaves have now been primed. I still have the Dominican Olor ligero left, but those will be harvested within the next week too.
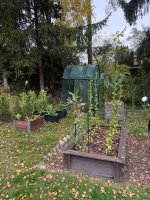
Patch030926.jpg

Some of the leaves have already finished curing and are now waiting to go into the kiln. I'm planning to put everything in at the same time, although I won't be able to start kilning for another five weeks or so.
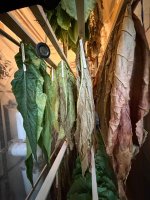
Curing-030926.jpg

Most of the leaves actually cured surprisingly well, considering how worried I was that things wouldn't work out. There's some unevenness in Piloto Cubano and CT Shade, but surprisingly little has ended up in the trash.

Quite a few of the Dominican Olor leaves still have a dark brownish-green color on the underside, while the top side is a deep brown. We'll see how they react to kilning. I think Bob mentioned earlier that he had leaves in a similar condition that eventually turned out really good.
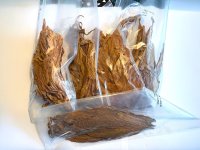
CuredandBagged-030926.jpg


I've now started putting the finished leaves straight into vacuum bags, sorted by variety and priming, so they'll be easy to store once they come out of the kiln. I tried flattening a small batch of Piloto Cubano (thanks @UmbriaFarmer for starting that great thread about flattening leaves), and they definitely pack away much more nicely that way.

For me, though, flattening would be quite an operation if I did it with all the leaves. After flattening, getting them dry enough for storage means spreading them out over quite a large area, and I just don't have that kind of space available. Well, technically I do have the whole house, but then the risk of disturbing the domestic peace starts getting a little too high. I'll probably only flatten the wrappers.

For some reason, this season has felt like a lot of work, even though I only had six varieties and 4–6 plants of each. Priming the whole crop means quite a bit of work sorting, tagging and keeping track of all the different leaves. Limited space and the short Finnish summer don't make things any easier. It would be great to just hang the stalks in an outdoor shed and let nature do its thing. But with the Finnish climate and my limited space, maintaining curing conditions is quite labor-intensive.

My thoughts are already turning to next year, and I think I'll probably concentrate on just a couple of varieties next season.

 

UmbriaFarmer

Well-Known Member
Joined
Feb 18, 2026
Messages
142
Points
63
Location
Umbria Italy
I am, every single day, grateful for how easy the climate here makes processing my tobacco. After I had stacked those first 200 leaves, they were still pretty damp, so a risk of mould. I left the two stacks outside in the shade for the afternoon and by 4pm they were so crispy dry I had to handle them very carefully to get them inside. The next morning the ambient humidity of about 70% overnight meant then had become nicely soft and pliable again but dry enough not to mould. You just couldn't find a more helpful climate. I salute you guys up north because I know you have to juggle things much more carefully and indeed even have much more work just to bring a crop to maturity. Well done guys!
 

Pasiasiainen

Well-Known Member
Joined
Jun 28, 2025
Messages
121
Points
93
Location
Finland
Kilning and curing all day long.

I started kilning my first batch about a week ago. I moistened the leaves and put most of them in vacuum bags with the open ends rolled closed. The CT Shade leaves were so big that I had to put them in giant Ziploc bags. I also put some of the volado leaves in smaller Ziploc bags and glass jars. I had already packed some of them in jars earlier so I decided to just put those into the kiln. Packing the leaves in bags is definitely a good way to go. You can fit a lot of leaves into the kiln at once that way.

Kilning141026.jpg

I also put a container of water at the bottom of the kiln to keep the air from getting completely dry. RH seems to be around 55%, and the temperature is 50–52°C.
Some of the leaves got a bit too moist at first, but managed to get them back to a medium/high case by leaving the bags open for a few hours.

Curing141026.jpg

About half of my crop is still in color curing. The humidity in my curing tent was fluctuating quite a bit, so I took the humidity controller out of the kiln and moved it to the tent. Now it's a bit more low-maintenance and I just need to fill the humidifier every few days.
 

Pasiasiainen

Well-Known Member
Joined
Jun 28, 2025
Messages
121
Points
93
Location
Finland
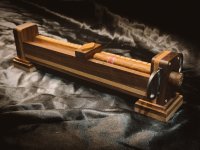
I put together a cigar tuck cutter from some scrap wood and a cheap cigar cutter. I embedded some iron nails lengthwise along the sides of the cigar groove, under a thin layer of veneer. The length stop is held in place by a neodymium magnet in the stop block, which sticks to the nails.

The screws didn't quite line up this time when I lost my concentration, but let's not worry about that...
The cutter works just fine, but to be honest the usability isn't that great. You have to feed the cigar through the hole in the cutter, which feels a bit awkward. Still, I'm sure it'll do the job for the few cigars I'll manage to make from my own leaves.

Do I really need a cutter like this? Not really, but it's always fun to build stuff like this.

IMG_2018.jpg IMG_2020.jpg
IMG_2019.jpg IMG_2035.jpg
 

Attachments

  • IMG_2017.jpg
    IMG_2017.jpg
    180.4 KB · Views: 10

UmbriaFarmer

Well-Known Member
Joined
Feb 18, 2026
Messages
142
Points
63
Location
Umbria Italy
We
I put together a cigar tuck cutter from some scrap wood and a cheap cigar cutter. I embedded some iron nails lengthwise along the sides of the cigar groove, under a thin layer of veneer. The length stop is held in place by a neodymium magnet in the stop block, which sticks to the nails.

The screws didn't quite line up this time when I lost my concentration, but let's not worry about that...
The cutter works just fine, but to be honest the usability isn't that great. You have to feed the cigar through the hole in the cutter, which feels a bit awkward. Still, I'm sure it'll do the job for the few cigars I'll manage to make from my own leaves.

Do I really need a cutter like this? Not really, but it's always fun to build stuff like this.

View attachment 61294 View attachment 61296
View attachment 61295 View attachment 61297
Well practical or not, you sure made a beautiful job of it! Compliments! Your scale I notice is metric so I'm guessing you're not in the US?
 

Pasiasiainen

Well-Known Member
Joined
Jun 28, 2025
Messages
121
Points
93
Location
Finland
Well practical or not, you sure made a beautiful job of it! Compliments! Your scale I notice is metric so I'm guessing you're not in the US?
Thank you, thank you! I have this habit that whenever I make tools for myself, I like to put a little extra effort into making them look nice too. Somehow, they're just more enjoyable to use when they look good. And yes, it's metric. I'm from Finland. :)
 

deluxestogie

Administrator
Staff member
Joined
May 25, 2011
Messages
26,574
Points
113
Location
near Blacksburg, VA
As soon as your tuck cutter image appeared on my computer screen, a broad smile swept over my face. What a lovely work of art. And the decorative tobacco leaf on the length stop! The colors and grain of the wood give it a vintage feel. Since I am only partway through my morning mug of coffee, it is officially the first smile of my day.

Bob

EDIT: I've added a link to the tuck cutter post to our Index of Key Forum Threads, under the Tools and Storage topic.
 
Last edited:
Top